Where to install the water softener in your new home?
- Published:
- Updated: January 13, 2025
Listen to this article
Summary
When installing a water softener in your new home, it is crucial to choose an ideal location that maximizes efficiency and ease of maintenance. The system should be installed near the main water supply, with adequate space for the mineral and brine tanks, access to a drainage system, and proximity to an electrical outlet. Common locations include basements, garages, and utility rooms. Proper installation ensures smooth operation, longevity, and optimal water quality.
- Accessibility: Choose a location with ample space for maintenance and future upgrades.
- Proximity to Water Source: Install the softener close to the main water line for effective treatment.
- Drainage and Electrical Setup: Ensure access to proper drainage and an electrical outlet for smooth operation.
The installation of a water softener not only enhances water quality but also serves as a preventive measure against the adverse effects of hard water. Hard water can lead to scale buildup in pipes, reduced efficiency of appliances, and increased energy consumption. Therefore, strategic placement and proper installation are critical to leveraging the full potential of your water softener. Whether you are building a new home or upgrading your current water system, this guide will provide valuable insights to make informed decisions.
Understanding the Home Water Softener System
Before diving into the specifics of installation, it is imperative to understand the basic workings of a home water softener system. A water softener is designed to remove calcium, magnesium, and certain other metal cations in hard water. The resultant ‘soft’ water is more compatible with soap and extends the lifespan of plumbing. Additionally, soft water helps improve the efficiency and longevity of water-using appliances by preventing mineral buildup.
A typical water softener consists of a mineral tank and a brine tank. The mineral tank contains resin beads that perform the ion exchange process, while the brine tank holds a salt solution that regenerates the resin beads. Understanding these components will aid in determining the ideal installation location. The resin beads play a crucial role in the softening process, as they attract and capture the hard minerals, allowing only softened water to pass through. Meanwhile, the brine tank’s function is to periodically recharge the resin beads, ensuring their continued effectiveness.
Factors to Consider Before Installation
Accessibility and Space Requirements

When planning for water softener installation, ensure that the chosen location provides ample space for both the mineral and brine tanks. The area should allow for easy access to perform maintenance tasks such as refilling the brine tank with salt and conducting routine inspections. Adequate space not only facilitates maintenance but also allows for potential future upgrades or expansions of your water treatment system.
Moreover, the location should be free from obstructions that could hinder access or pose a risk to the equipment. Consider any nearby structures or utilities that might interfere with the installation or maintenance processes. Planning for sufficient workspace will help prevent future inconveniences and ensure the longevity of your water softener system.
Proximity to Water Source
The water softener should ideally be installed as close as possible to the point where the main water line enters your home. This positioning ensures that all the water entering the home is treated, protecting your pipes and appliances from hard water damage. A centralized location minimizes the need for extensive plumbing modifications and reduces the chances of untreated water bypassing the system.
Installing the softener near the main water supply also helps in maintaining consistent water pressure throughout the home. This ensures that the softened water reaches all fixtures and appliances efficiently. Careful consideration of the water source location is essential for optimizing the performance and cost-effectiveness of your water softening system.
Drainage Availability
Proper drainage is essential for the regeneration process of the water softener. During regeneration, the brine solution is flushed through the mineral tank and then needs to be disposed of safely. Therefore, the installation site must have access to a drain, which can be a floor drain, utility sink, or any other suitable drainage outlet. Proper drainage prevents the risk of water damage and ensures the smooth operation of the regeneration cycle.
In addition to ensuring the availability of a drain, it is important to confirm that the drainage system can handle the discharge flow rate of the water softener. Inadequate drainage capacity can lead to overflow or backflow issues, potentially causing damage to your home. Consulting with a plumbing professional can help verify that your drainage system is suitable for the water softener’s requirements.
Electrical Outlet
Most water softeners require an electrical outlet nearby to power the control valve and timer. Ensure that a safe and appropriately rated electrical outlet is available at the installation site. The outlet should be protected from moisture and comply with local electrical codes to ensure safety and reliability.
Consider the proximity of the outlet to the water softener to avoid the use of extension cords, which can pose a fire hazard. Additionally, verify that the electrical circuit can support the power requirements of the water softener without overloading. Proper electrical setup is crucial for the seamless operation of the system’s control mechanisms.
Ideal Locations for Water Softener Installation
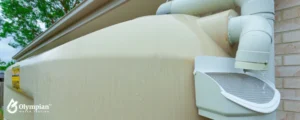
Basement Installations
Basements are often the most convenient location for water softener installations due to their proximity to the main water line and the availability of space and drainage. However, ensure that the basement conditions do not pose a risk of flooding, which could damage the equipment. Consider installing a sump pump or other flood prevention measures if your basement is prone to water accumulation.
Basements typically offer the added benefit of being out of sight, keeping the water softener discreetly tucked away. They also tend to have cooler temperatures, which can be beneficial for the longevity of the equipment. However, it is important to ensure that the basement environment does not expose the softener to extreme temperature fluctuations.
Garage Installations
Garages can also serve as an excellent installation site, provided they offer protection from extreme temperatures. The garage should have sufficient space to accommodate the softener system and ensure easy accessibility for maintenance. Consider the insulation and ventilation of the garage to protect the equipment from freezing temperatures or excessive heat.
While garages provide ample space and easy access, they may require additional measures to ensure the safety and efficiency of the water softener. For instance, it may be necessary to install a protective cover or enclosure for the equipment to shield it from dust and potential impacts. Proper planning can make a garage installation a practical and effective option.
Utility Room Installations
If your home has a designated utility room, this can be an ideal location for the water softener. Utility rooms typically have access to plumbing and drainage systems, which can simplify the installation process. Additionally, these rooms are often designed to accommodate equipment like water softeners, making them a convenient choice.
Utility rooms also provide a controlled environment, reducing the risk of exposure to adverse conditions. They offer easy access for routine maintenance and are usually situated near other essential utilities, making plumbing and electrical connections straightforward. Leveraging the existing infrastructure of a utility room can streamline the installation and enhance the performance of your water softener system.
Installation Process Overview
Site Preparation
Once the installation site is chosen, prepare the area by clearing any obstructions and ensuring that the floor is level. It is also advisable to check the water pressure to ensure it falls within the manufacturer’s recommended range. Addressing these preliminary steps helps prevent installation issues and ensures optimal functioning of the water softener.
Proper site preparation also involves verifying the condition of existing plumbing and electrical systems. Any necessary repairs or upgrades should be completed before installing the water softener. Thorough preparation sets the stage for a smooth installation process and long-term operational success.
Plumbing Connections
The installation involves connecting the water softener to the main water supply line. It is crucial to follow the manufacturer’s instructions for plumbing connections to avoid leaks and ensure efficient operation. A bypass valve is typically installed, allowing water to bypass the softener if maintenance is required. This feature is essential for maintaining water flow during servicing or repairs.
Proper plumbing connections also entail checking for compatibility between the water softener and your existing plumbing materials. Using appropriate fittings and connectors ensures a secure and leak-free installation. Consulting with a professional plumber can help address any complex plumbing requirements and enhance the reliability of the system.
Electrical Setup
Connect the control valve of the water softener to the electrical outlet. Ensure that the electrical wiring complies with local codes and standards to prevent any safety hazards. Proper electrical setup is crucial for the seamless operation of the system’s control mechanisms.
In addition to ensuring compliance, it is important to verify that the electrical components are adequately protected from potential water exposure. Installing a ground fault circuit interrupter (GFCI) can provide an extra layer of safety. A well-executed electrical setup contributes significantly to the overall reliability and performance of the water softener.
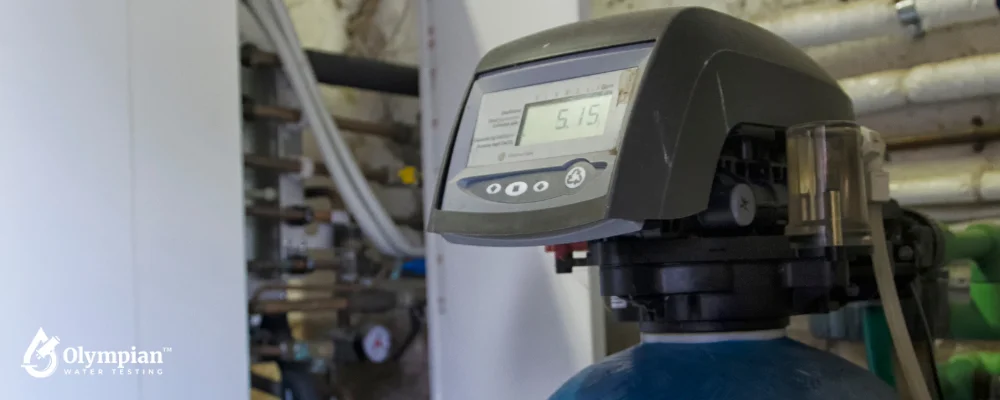
Initial Setup and Programming
After plumbing and electrical connections are complete, the next step is to program the water softener settings. This includes setting the time, hardness level of your water, and the regeneration cycle frequency. Refer to the user manual for specific programming instructions tailored to your water conditions. Accurate programming ensures that the softener operates efficiently and meets your household’s water needs.
Initial setup also involves testing the system to confirm that it is functioning correctly. Check for any leaks, unusual noises, or error messages on the control panel. Addressing any issues during the initial setup phase can prevent future operational problems and help maintain the integrity of the water softener system.
Maintaining Your Water Softener
Regular maintenance of your water softener is vital for its longevity and performance. This includes routinely checking the salt levels in the brine tank, cleaning the resin tank, and inspecting the system for any signs of wear or damage. A proactive maintenance routine can prevent costly repairs and ensure the continuous supply of soft water to your home.
Salt Management
Ensure that the brine tank is always filled with the appropriate type of salt. It is recommended to use high-quality salt to prevent the formation of salt bridges, which can impede the regeneration process. Monitoring salt levels and topping up as needed is a simple yet crucial aspect of water softener maintenance.
Different types of salt, such as solar, evaporated, or rock salt, may be used depending on your softener’s specifications. Understanding the pros and cons of each type can help you make informed choices that optimize the system’s efficiency. Regularly checking the brine tank and using the right salt ensures that your water softener functions smoothly and effectively.
Professional Servicing
Engage a professional to service your water softener at least once a year. A professional can conduct a thorough inspection, clean the components, and make any necessary adjustments to ensure optimal performance. Professional servicing helps identify and resolve potential issues before they escalate into major problems.
In addition to routine servicing, professionals can provide valuable advice on optimizing the operation of your water softener based on changes in water quality or household needs. Establishing a relationship with a trusted service provider can enhance the longevity and efficiency of your water softener system.
Conclusion
Installing a water softener in your new home is a significant step toward improving water quality and protecting your appliances. By carefully considering the factors discussed and choosing an ideal location, you can ensure that your home water softener system functions efficiently and effectively. Regular maintenance and professional servicing will further enhance the system’s performance, providing you with soft, high-quality water for years to come.
With over three decades of experience in water quality analysis, I hope this comprehensive guide has equipped you with the knowledge needed to make informed decisions about water softener installation. Should you have any further queries or require personalized advice, do not hesitate to consult with a water quality professional. Investing in the right water softener setup can yield long-term benefits, contributing to a healthier home environment and reduced maintenance costs for your appliances.
Share this on social media:
Facebook
Twitter
LinkedIn

Related Posts